無駄と文化

実用的ブログ

JavaScript のデータを CSV で保存する

意外と需要のある JavaScript のデータを CSV として保存するスニペットを書き留めます。

var data = [
  ['name'  , 'age', 'gender'],
  ['Andrew', 26   , 'male'  ],
  ['Lisa'  , 21   , 'female'],
  ['Fred'  , 41   , 'male'  ],
]

このような多重配列を元にして、

f:id:todays_mitsui:20170423135440p:plain

このような CSV を保存します。

ちなみに、

var data = [
  {name: 'Andrew', age:26   , gender: 'male'  },
  {name: 'Lisa'  , age:21   , gender: 'female'},
  {name: 'Fred'  , age:41   , gender: 'male'  },
]

このような オブジェクトの配列 にも対応させました。


んで、
最初に書いておきますが、 Mac版 Excel には対応していない CSV を扱っています 。ご容赦ください。


コード

さっそくドン、

class CSV {
  constructor(data, keys = false) {
    this.ARRAY  = Symbol('ARRAY')
    this.OBJECT = Symbol('OBJECT')

    this.data = data

    if (CSV.isArray(data)) {
      if (0 == data.length) {
        this.dataType = this.ARRAY
      } else if (CSV.isObject(data[0])) {
        this.dataType = this.OBJECT
      } else if (CSV.isArray(data[0])) {
        this.dataType = this.ARRAY
      } else {
        throw Error('Error: 未対応のデータ型です')
      }
    } else {
      throw Error('Error: 未対応のデータ型です')
    }

    this.keys = keys
  }

  toString() {
    if (this.dataType === this.ARRAY) {
      return this.data.map((record) => (
        record.map((field) => (
          CSV.prepare(field)
        )).join(',')
      )).join('\n')
    } else if (this.dataType === this.OBJECT) {
      const keys = this.keys || Array.from(this.extractKeys(this.data))

      const arrayData = this.data.map((record) => (
        keys.map((key) => record[key])
      ))

      console.log([].concat([keys], arrayData))

      return [].concat([keys], arrayData).map((record) => (
        record.map((field) => (
          CSV.prepare(field)
        )).join(',')
      )).join('\n')
    }
  }

  save(filename = 'data.csv') {
    if (!filename.match(/\.csv$/i)) { filename = filename + '.csv' }

    console.info('filename:', filename)
    console.table(this.data)

    const csvStr = this.toString()

    const bom     = new Uint8Array([0xEF, 0xBB, 0xBF]);
    const blob    = new Blob([bom, csvStr], {'type': 'text/csv'});
    const url     = window.URL || window.webkitURL;
    const blobURL = url.createObjectURL(blob);

    let a      = document.createElement('a');
    a.download = decodeURI(filename);
    a.href     = blobURL;
    a.type     = 'text/csv';

    a.click();
  }

  extractKeys(data) {
    return new Set([].concat(...this.data.map((record) => Object.keys(record))))
  }

  static prepare(field) {
    return '"' + (''+field).replace(/"/g, '""') + '"'
  }

  static isObject(obj) {
    return '[object Object]' === Object.prototype.toString.call(obj)
  }

  static isArray(obj) {
    return '[object Array]' === Object.prototype.toString.call(obj)
  }
}

CSV というクラスを定義しています。
使い方はこのように、

(new CSV(data)).save('foobar.csv')

調子こいて スプレッド演算子Set などを多用しているので、比較的新しい Chrome とかでないと動かないかも知れませんね。


CSV の仕様

CSV はとてもシンプルな仕様です。
フィールド(Excel でいうところのセル)をカンマ , で区切ったものがレコードになります。
レコード同士は改行 \n で区切ります。

フィールドに ,\n値として 含まれる場合は、それがフィールドやレコードの区切り文字ではないことを示すためにフィールド全体をダブルクォート " で囲む必要があります。
さらに " で囲ったフィールドの中に " が値として含まれる場合は " 自体をエスケープしてあげる必要があります。エスケープは " を二つ重ねて "" に置換することで行います。


文字コード

CSV ファイルを保存する際の文字コードについては特に規定されていませんが、 日本語を含む CSV を Excel で開きたい 場合には少々のテクニックを要します。

採用する文字コードの選択肢はいくつかありますが、

  1. Shift_JIS
  2. BOM 付き UTF-8
  3. BOM 付き UTF-16LE

今回は 2. BOM 付き UTF-8 を採用しています。
ただし、そうやって保存した CSV は Mac 版の Excel で開くと文字化けします


日本語を含む CSV を Excel で正しく開かせるためのテクニックについては、「CSV Unicode Excel」などのフレーズで検索していただけると闇が垣間見られると思います。


元データを用意する

もうこの記事で伝えたいことの本題は終わっているんですが、データを用意する方法にも軽く触れておきます。

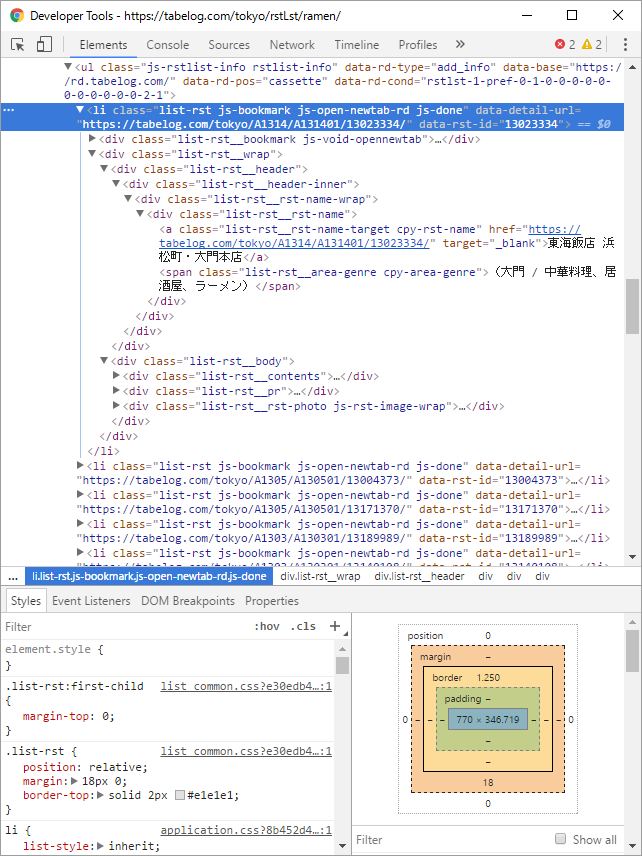
例えば、ここに食べログの東京都内のラーメン屋の検索結果画面がありまして、

f:id:todays_mitsui:20170423135518p:plain

インスペクタとにらめっこしまして、

f:id:todays_mitsui:20170423135538p:plain

jQuery などを駆使してこのようなコードを書きますと、

const data = $('.list-rst').map(function() {
  const $this = $(this)

  const name         = $this.find('.list-rst__rst-name a').text()
  const score        = parseFloat($this.find('.list-rst__rating-val').text())
  const reviewCount  = parseInt($this.find('.list-rst__rvw-count-num').text(), 10)
  const dinnerBudget = $this.find('.cpy-dinner-budget-val').text()
  const lunchBudget  = $this.find('.cpy-lunch-budget-val').text()
  const holiday      = $this.find('.list-rst__holiday-datatxt').text()
  const comment      = $this.find('.list-rst__pr-title').text().trim()
  const searchWord   = $this.find('.list-rst__search-word .list-rst__search-word-item').map(function() {
    return $(this).text().trim()
  }).get()

  return {
    name,
    score,
    reviewCount,
    dinnerBudget,
    lunchBudget,
    holiday,
    comment,
    searchWord,
  }
}).get()

すると、このようなデータが取れますので、
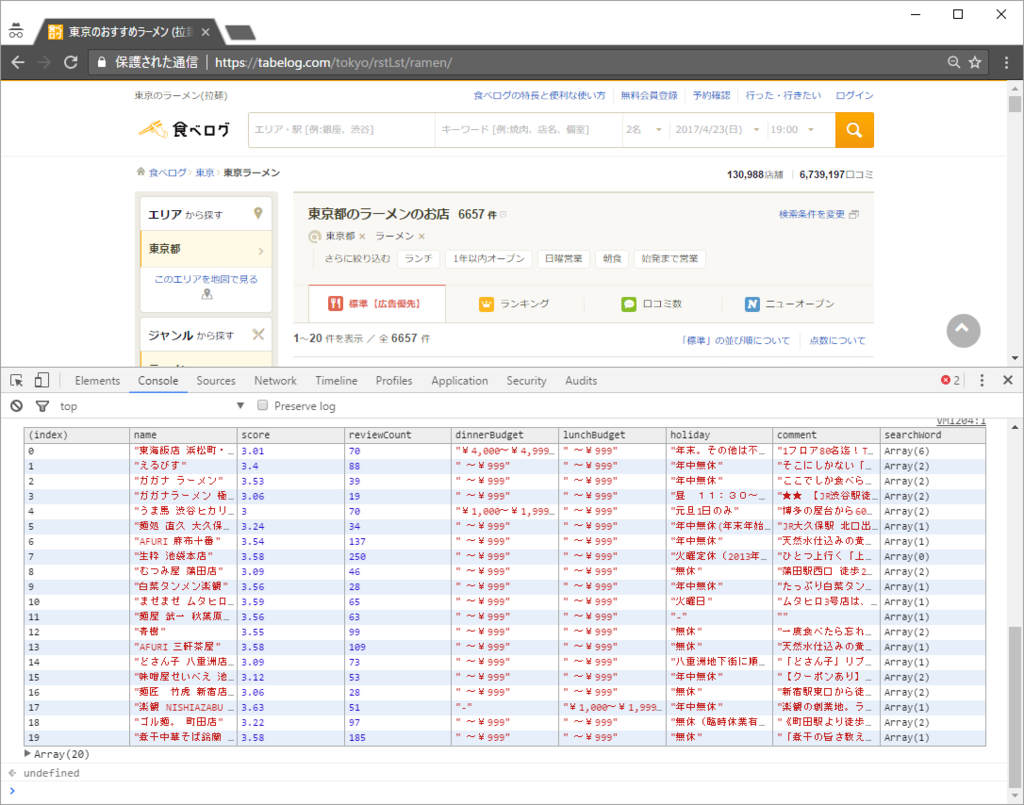
f:id:todays_mitsui:20170423135554p:plain

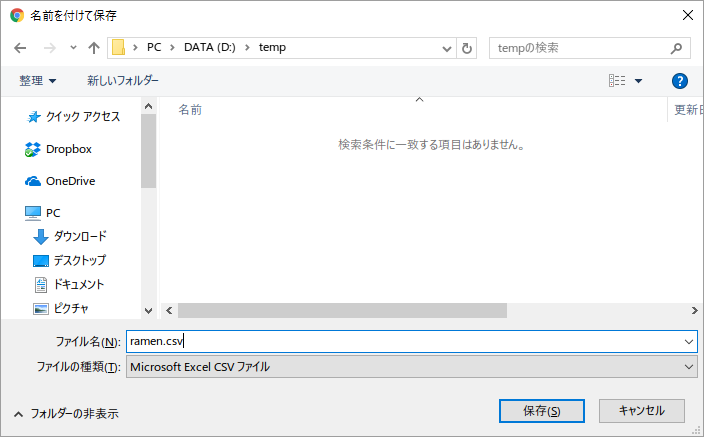
先ほどの CSV クラスとしてインスタンス化して保存すると、

(new CSV(data)).save('ramen.csv')
f:id:todays_mitsui:20170423135606p:plain

このようなダイアログが開いてデータを保存できるわけですね。

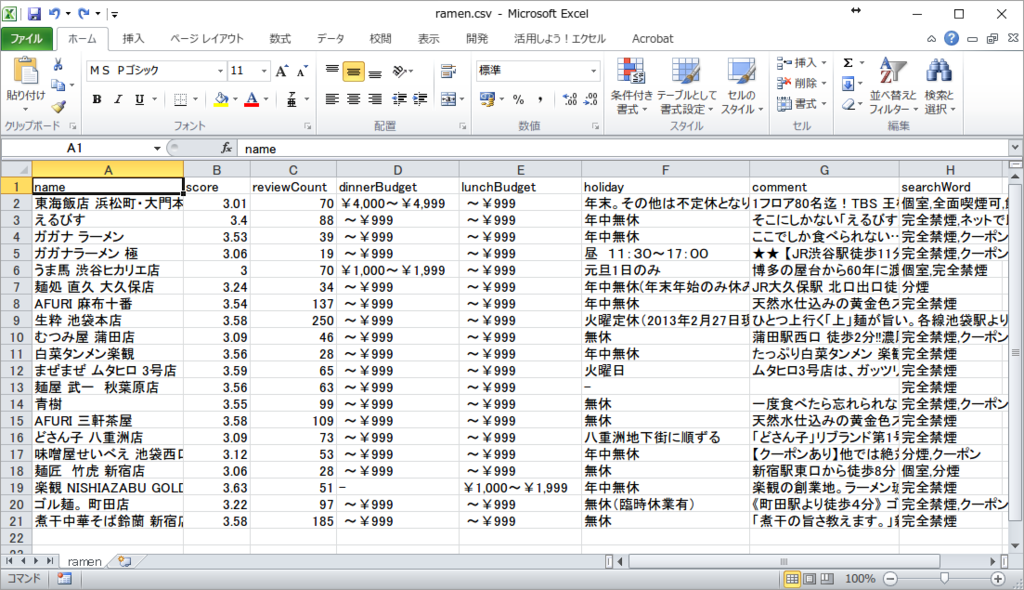
Excel で開くと、
f:id:todays_mitsui:20170423135620p:plain

はい、このように。


まとめ

数ヶ月後に『あー、このサイトの情報テキトーに CSV 保存してぇ』という場面に出くわすであろう自分に捧げます。


私からは以上です。

Python3 で言語処理100本ノック 2015 - 第1章

乾・岡崎研究室が公開している 言語処理100本ノック 2015 に取り組んで行きます。
使用する言語は Python3 です。

第1章から第10章で構成されているのでまずは第1章から。
ではスタート。


00. 文字列の逆順

文字列"stressed"の文字を逆に(末尾から先頭に向かって)並べた文字列を得よ.

print("stressed"[::-1])
# => desserts

Python のスライスを使うだけですね。


01. 「パタトクカシーー」

「パタトクカシーー」という文字列の1,3,5,7文字目を取り出して連結した文字列を得よ.

print("パタトクカシーー"[::2])
# => パトカー

これもスライスを使うだけ。
Python のスライスは高機能ですね。

ちなみに "パタトクカシーー" から "タクシー" を取り出したいときは、

print("パタトクカシーー"[1::2])
# => タクシー


02. 「パトカー」+「タクシー」=「パタトクカシーー」

「パトカー」+「タクシー」の文字を先頭から交互に連結して文字列「パタトクカシーー」を得よ.

print("".join(s1+s2 for s1, s2 in zip("パトカー", "タクシー")))
# => パタトクカシーー

zip して join する感じで。
この程度ならまだワンライナーで書いてしまいます。


03. 円周率

“Now I need a drink, alcoholic of course, after the heavy lectures involving quantum mechanics."という文を単語に分解し,各単語の(アルファベットの)文字数を先頭から出現順に並べたリストを作成せよ.

import re

sentence = "Now I need a drink, alcoholic of course, after the heavy lectures involving quantum mechanics."

print([len(word) for word in re.split(r"[\s,.]+", sentence) if "" != word])
# => [3, 1, 4, 1, 5, 9, 2, 6, 5, 3, 5, 8, 9, 7, 9]

文章を単語毎に分割する部分を re.split(r"[\s,.]+", sentence) としています。
単語の区切りに 空白(\s), ,, . を選んでいますが、これは扱う言語の種類によってカスタマイズする必要がありますね。


04. 元素記号

“Hi He Lied Because Boron Could Not Oxidize Fluorine. New Nations Might Also Sign Peace Security Clause. Arthur King Can."という文を単語に分解し,1, 5, 6, 7, 8, 9, 15, 16, 19番目の単語は先頭の1文字,それ以外の単語は先頭に2文字を取り出し,取り出した文字列から単語の位置(先頭から何番目の単語か)への連想配列(辞書型もしくはマップ型)を作成せよ.

import re

specific_indexes = (1, 5, 6, 7, 8, 9, 15, 16, 19)

sentence = "Hi He Lied Because Boron Could Not Oxidize Fluorine." \
           " New Nations Might Also Sign Peace Security Clause. Arthur King Can."

print({word[:1] if index in specific_indexes else word[:2]: index for index, word in enumerate(re.split(r"[\s,.]+", sentence), start=1) if "" != word})
# =>
# {
#   'Si': 14, 'He': 2, 'Ar': 18, 'O': 8, 'K': 19, 'C': 6,
#   'N': 7, 'Li': 3, 'B': 5, 'Mi': 12, 'Cl': 17, 'S': 16,
#   'Be': 4, 'Al': 13, 'F': 9, 'Ca': 20, 'P': 15, 'H': 1,
#   'Ne': 10, 'Na': 11
# }

うわ、このコードはひどい。
本来は適切に関数を定義したり、適切に名付けた変数を使えばもっと読みやすくなるのですが、なんか出題自体が恣意的だったのでモジュール化する気力が湧きませんでした。

全体を 辞書内包表記 で処理しています。単語毎の分割は re.split(r"[\s,.]+", sentence) で。
単語の出現順を扱うために enumerate() を使って index という変数に受けています。
indexspecific_indexes = (1, 5, 6, 7, 8, 9, 15, 16, 19) に含まれていれば、対応する単語の先頭1文字だけを取り出し(word[:1])、含まれていなければ先頭2文字を取り出して(word[:2])辞書の Key にします。

辞書内包表記, 三項演算子, スライス, enumerate(), re.split() を1行に詰め込む。行儀の悪いコードのお手本みたいですね。


05. n-gram

与えられたシーケンス(文字列やリストなど)からn-gramを作る関数を作成せよ.この関数を用い,"I am an NLPer"という文から単語bi-gram,文字bi-gramを得よ.

n-gram という概念自体、日本語だけでは説明しづらいですよね。
n-gram は「文章中に現れる N 個連続した連なり」でしょうか。

"Hello" の 3(tri)-gram は {"Hel", "ell", "llo"} という集合になります。

import re


def n_gram(seq, n=2):
    seq_set = (seq[i:] for i in range(n))

    return tuple("".join(chars) for chars in zip(*seq_set))


sentence = "I am an NLPer"

char_bi_gram = n_gram(sentence)
print("char_bi_gram:", char_bi_gram)
# => char_bi_gram:
# ('I ', ' a', 'am', 'm ', ' a', 'an', 'n ', ' N', 'NL', 'LP', 'Pe', 'er')

words = re.split(r"[\s,.]", sentence)
word_bi_gram = n_gram(words)
print("word_bi_gram:", word_bi_gram)
# => word_bi_gram:
# ('Iam', 'aman', 'anNLPer')

n_gram() という関数を定義しました。

(seq[i:] for i in range(n)) は例えば "Hello" という文字列から ("Hello", "ello", "llo") と開始を1文字ずつずらした N 個組みのシーケンスを生成します。
それを zip すると (("H", "e", "l"), ("e", "l", "l"), ("l", "l", "o")) という組みが取れるので、あとは適切に join してあげる感じで。

これ、Haskell でリスト中の連続した N 個の要素を組みにして走査したいときのやり方をそのまま持ってきました。いやぁ、Haskell やってて良かった。


06. 集合

“paraparaparadise"と"paragraph"に含まれる文字bi-gramの集合を,それぞれ, XとYとして求め,XとYの和集合,積集合,差集合を求めよ.さらに,'se'というbi-gramがXおよびYに含まれるかどうかを調べよ.

def n_gram(seq, n=2):
    seq_set = (seq[i:] for i in range(n))

    return tuple("".join(chars) for chars in zip(*seq_set))


word_x = "paraparaparadise"
word_y = "paragraph"

x = set(n_gram(word_x))
y = set(n_gram(word_y))

union = x | y
print("union:", union)
# => union: {'pa', 'se', 'ad', 'is', 'ar', 'ap', 'gr', 'ag', 'ph', 'ra', 'di'}

intersection = x & y
print("intersection:", intersection)
# => intersection: {'pa', 'ra', 'ar', 'ap'}

difference_x_y = x - y
print("difference (x-y):", difference_x_y)
# => difference (x-y): {'di', 'is', 'se', 'ad'}

difference_y_x = y - x
print("difference (y-x):", difference_y_x)
# => difference (y-x): {'ph', 'ag', 'gr'}

print("'se' in X ?:", "se" in x)
# => 'se' in X ?: True

print("'se' in Y ?:", "se" in y)
# => 'se' in Y ?: False

さきほどの n_gram() を流用します。

Python には Set という集合を扱うためのデータ型があって、一通りの集合演算がメソッドと演算子で用意されているので便利です。


07. テンプレートによる文生成

引数x, y, zを受け取り「x時のyはz」という文字列を返す関数を実装せよ.さらに,x=12, y=“気温”, z=22.4として,実行結果を確認せよ.

def template(x, y, z):
    return u"{x}時の{y}は{z}".format(x=x, y=y, z=z)

print(template(x=12, y="気温", z=22.4))
# => 12時の気温は22.4

文字列の .format() メソッドを使っとけというだけの課題ですね。


08. 暗号文

与えられた文字列の各文字を,以下の仕様で変換する関数cipherを実装せよ.

  • 英小文字ならば(219 - 文字コード)の文字に置換
  • その他の文字はそのまま出力

この関数を用い,英語のメッセージを暗号化・復号化せよ.

import re


def cipher(plaintext):
    return re.sub(r"[a-z]", lambda m: chr(219 - ord(m.group(0))), plaintext)


plaintext = "Lorem ipsum dolor sit amet, consectetur adipiscing elit, sed do eiusmod tempor" \
            " incididunt ut labore et dolore magna aliqua."
print("Plaintext:", plaintext)
# => Plaintext:
# Lorem ipsum dolor sit amet, consectetur adipiscing elit,
# sed do eiusmod tempor incididunt ut labore et dolore magna aliqua.

encrypt = cipher(plaintext)
print("Encryption:", encrypt)
# => Encryption:
# Llivn rkhfn wloli hrg znvg, xlmhvxgvgfi zwrkrhxrmt vorg,
# hvw wl vrfhnlw gvnkli rmxrwrwfmg fg ozyliv vg wloliv nztmz zorjfz.

decrypt = cipher(encrypt)
print("Decryption:", decrypt)
# => Decryption:
# Lorem ipsum dolor sit amet, consectetur adipiscing elit,
# sed do eiusmod tempor incididunt ut labore et dolore magna aliqua.

最初、『まず文章を文字毎に分解して…』とか考えていたんですが、 re.sub を使って条件に合う文字だけ置換してあげれば一撃でした。


09. Typoglycemia

スペースで区切られた単語列に対して,各単語の先頭と末尾の文字は残し,それ以外の文字の順序をランダムに並び替えるプログラムを作成せよ. ただし,長さが4以下の単語は並び替えないこととする. 適当な英語の文(例えば"I couldn’t believe that I could actually understand what I was reading : the phenomenal power of the human mind .“)を与え,その実行結果を確認せよ.

Typoglycemia って何? という方はコチラを参照、

ただの都市伝説かと思いきや奥深いんですよ。

import random


def stir(word):
    if 5 > len(word):
        return word

    head = word[0]
    last = word[-1]
    body = word[1:-1]

    return head + "".join(random.sample(body ,len(body))) + last

def genTypoglycemia(sentence):
    return " ".join(map(stir, sentence.split(" ")))


plaintext = "I couldn't believe that I could actually understand what I was reading : the phenomenal power of the human mind ."
print("Plaintext:", plaintext)
# => Plaintext:
# I couldn't believe that I could actually understand what I was reading :
# the phenomenal power of the human mind .

typoglycemia = genTypoglycemia(plaintext)
print("Typoglycemia:", typoglycemia)
# => Typoglycemia:
# I clon'udt bleivee that I cloud aatlulcy unredantsd what I was raiedng :
# the penonehmal pewor of the hmaun mind .

意外と 文字の順序をランダムに並び替える てところで突っかかったんでコチラを参考にしました!


所感

第1章はここまで。
正直、第1章は仕事終わりにビール飲みながら暇つぶしで解いていたんですが、後半はそういうわけにもいかなくなるでしょうね。

第2章以降は解き終わり次第随時上げていきます。


私からは以上です。


コード全部まとめ

回答 - 言語処理100本ノック 2015 - 第1章 · GitHub


その他の章の回答はこちらから

blog.mudatobunka.org

Python で日時計算 ~ 月初とか月末とか N ヵ月前とか

Python で日付計算と言えば datetime モジュールですね。まぁまぁ便利なんですが、標準では 月初月末 を求めることができません。
なのでちょっとしたユーティリティコードとして書いておきました。


N ヶ月後・N ヶ月前

add_month()N ヶ月後の同日同時間 を求める関数です。同様に sub_month()N ヶ月前の同日同時間 を求めます。
2月31日 のように計算結果が存在しない日付になってしまう場合は、同月の末日を返します。

本当は datetime.timedelta を使えれば良かったんですが、datetime.timedelta では N ヶ月差を表現することはできないようです。


月初・月末

現在持っている日付の 月初月末 を求める関数も書きました。
start_of_month() は月初を、end_of_month() は月末を返します。


コード

# -*- coding: utf-8 -*-

from datetime import datetime
from calendar import monthrange


def add_month(_date, month_delta):
    """{month_delta} ヵ月後の同日の日時を返す

    >>> add_month(datetime.datetime(2017, 1, 30, 5, 20, 15), month_delta=1)
    datetime.datetime(2017, 2, 28, 23, 59, 59)

    >>> add_month(datetime.datetime(2017, 1, 15, 5, 20, 15), month_delta=1)
    datetime.datetime(2017, 2, 15, 5, 20, 15)

    >>> add_month(datetime.datetime(2017, 1, 30, 5, 20, 15), month_delta=13)
    datetime.datetime(2018, 2, 28, 23, 59, 59)
    """

    year = _date.year
    month = _date.month
    day = _date.day
    hour = _date.hour
    minute = _date.minute
    second = _date.second
    microsecond = _date.microsecond

    alt_year = year
    alt_month = month + month_delta

    if alt_month > 12:
        month_overflow = alt_month

        alt_year += month_overflow // 12
        alt_month = month_overflow % 12
    elif alt_month <= 0:
        month_overflow = alt_month

        alt_year += (month_overflow - 1) // 12
        alt_month = (month_overflow - 1) % 12 + 1

    try:
        return datetime(alt_year, alt_month, day, hour, minute, second, microsecond)
    except ValueError:
        return end_of_month(datetime(alt_year, alt_month, 1, hour, minute, second, microsecond))

def sub_month(_date, month_delta):
    """{month_delta} ヵ月前の同日の日時を返す

    >>> sub_month(datetime.datetime(2017, 3, 30, 5, 20, 15), month_delta=1)
    datetime.datetime(2017, 2, 28, 23, 59, 59)

    >>> sub_month(datetime.datetime(2017, 3, 15, 5, 20, 15), month_delta=1)
    datetime.datetime(2017, 2, 15, 5, 20, 15)

    >>> sub_month(datetime.datetime(2017, 3, 20, 5, 20, 15), month_delta=5)
    datetime.datetime(2016, 10, 20, 5, 20, 15)
    """

    return add_month(_date, -month_delta)

def start_of_month(_date):
    """その月の月初の時を返す

    >>> start_of_month(datetime.datetime(2017, 3, 15))
    datetime.datetime(2017, 3, 1, 0, 0)

    >>> start_of_month(datetime.datetime(2017, 2, 28, 10, 10, 10))
    datetime.datetime(2017, 2, 1, 0, 0)
    """

    year = _date.year
    month = _date.month

    return datetime(year, month, 1, 0, 0, 0)

def end_of_month(_date):
    """その月の月末の日時を返す

    >>> end_of_month(datetime.datetime(2017, 3, 15))
    datetime.datetime(2017, 3, 31, 23, 59, 59)

    >>> end_of_month(datetime.datetime(2017, 2, 28, 10, 10, 10))
    datetime.datetime(2017, 2, 28, 23, 59, 59)
    """

    year = _date.year
    month = _date.month
    end_of_month = monthrange(year, month)[1]

    return datetime(year, month, end_of_month, 23, 59, 59)


ちなみに、これらの関数名は PHP の良く出来た日付計算ライブラリ Carbon を大いに参考にしています。

一応、Gist があります。

Python で日時計算 ~ 月初とか月末とか N ヵ月前とか · GitHub


私からは以上です。